Skip to Main Content

Introduction to Britannia Mill Library

In the Library and around campus you will see Kyocera MFDs (Multi Function Devices).  They look like standard photocopiers but include printing and scanning options and you can use any that are in student facing areas.  Have a look at the tabs on this page for more information.

You can send documents to print from  student PCs in the library OR from your personal device to any MFD (multi function device) on campus. You can find out more about printing from your own device on the next tab..

  • Complete your document in the relevant package (Word, PowerPoint, Excel etc) and then send to print.  From the printer options menu choose from the following:
    • myprintblack on pcut-prd-ss01 - (set as default)
    • myprintcolour on pcut-prd-ss01
       
  • Scan your student ID card on the white card scanner image at the front of the machine OR press the Username and Password button on the display screen to log in via the touch panel.
     
  •  A screen will open showing the number of documents waiting to be printed.
    • To print all jobs – click on the Print All  one touch button
    • To print/delete selected jobs, click on the Print Release Button
       
  • The screen will show a list of jobs waiting to be printed, click on the one you would like to print/delete and press the print button or the delete button.

Your documents will then be printed. 

TIP:  Give the printer time to download from the server, especially if your document is large; we often find uncollected documents left on the printers.


Printing from your own device.

Simply follow these steps:

  1. Log-in to your University email account.
  2. Use your University email account to email the file you wish to print to papercut@derby.ac.uk.
  3. You will be sent an email notification once the file has been successfully sent to the printing line up.
  4. Use any MFD to print as outlined above.

The following files types (attachments) are supported:

  • Microsoft Excel
  • Microsoft PowerPoint
  • Microsoft Word
  • PDF
  • Picture Files
  • Log in to the MFD as before.
  • Place your document on the document feeder on top of the device or lift the lid to place on the glass panel.
  • click on the Device Functions button to access the photocopy options.  You will then see a screen as shown below.

  • Select COPIES (top right) to select the number of copies you want to make (if you need more than 1)
  • You can copy single or double sided documents; select 1-sided>>1-sided to open a menu of options.  (You can also change a single sided document to double sided if you want)
  • Use the buttons on the touch screen to select Zoom, staples, combine etc as required

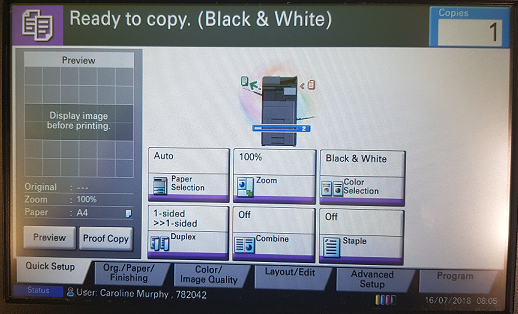
When you are ready to print, select the Green start button on the display screen area of the machine.

TIP: remember to remove your original documents from the glass or feed tray area of the machine.

Log in to the MFD as before.

Place your document on the document feeder on top of the device or lift the lid to place on the glass panel.

Select the Scan button to access the Scan options.

You can then select:

  • Scan to my email. You can also choose to have the scan in OCR (optical character recognition)
  • Scan to shared folder  

Select the relevant option to scan your file.

Click the Settings button to complete scanning you document.

TIP: Remember to remove your original document from the glass or feed tray of the machine.


Print credit can be added  to your account using your Debit or Credit card using the Online Print Portal.

  • Log into UDO
  • Click on the Money Tile
  • Click on Add Print credits
  • Click Link to add Print Credits

IT Services have recently introduced two-factor authentication for this service.  You can find out more on their student help pages here